
CyberDefenders - CTF01 Writeup
Background
Sometime around August 2021, I started my journey to study the side of Blue Teaming by enrolling myself in my teammates' company, GuideM. GuideM offers Red and Blue Team training, Ethical Hacking VAPT for Red and Cyber Defense & Threat Hunting for Blue.

Fast Forward to September 2021 and after reading bunch of reviews, I decided to take the eLearnSecurity Certified Digital Forensics Professionals (eCDFP). I passed the exam and now preparing for eCTHPv2 examination.
Days after passing the exam, I noticed that there was an ongoing live CTF in CyberDefenders.
CTF01
I found the CTF challenging and interesting, so I decided to make a writeup.
Challenge Description
You have been called to analyze a compromised Linux server. Figure out how the threat actor gained access, what modifications were applied to the system, and what persistent techniques were utilized. (e.g. backdoors, users, sessions, etc).
Challenge File
RedHat.zip
Inside the challenge file, we found a file named 02.E01.

Commands I used for mounting:
sudo mkdir rawimage
sudo ewfmouunt 02.E01 rawimage
sudo mkdir mountpoint
sudo mount ./rawimage/ewf1 ./mountpoint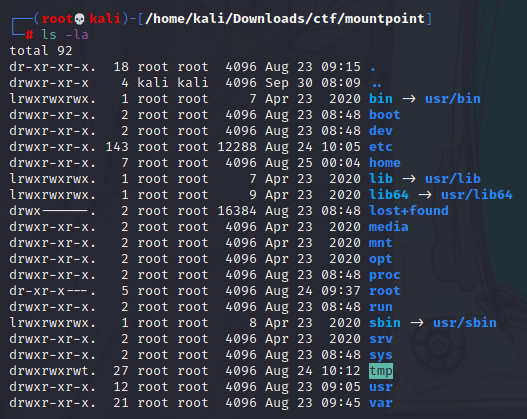
Questions
- What is the RHEL version of the operating system?
Command to get the solution:cat etc/redhat-release
It will return the version of redhat. - How many users had a login shell?
Command:cat etc/passwd | grep "/bin/bash"
It will return the users with shell. - How many users were allowed to run the SUDO command on the system?
Commands:
1. To get the sudoers:cat etc/sudoers
2. To get the users:cat etc/group
First, need to read the sudoers and find the group name then search that group in etc/group to get the number of users. - What was the password of rossatron account?
Commands:
1. To get the hashed password:cat etc/shadow
2. Save the hashed password into a text file
3. To crack the hashed password:john --wordlist=/usr/share/wordlists/rockyou.txt rossatron.txt - What was the victim's IP address?
Command:cat var/log/messages | grep "Registering new address" | grep "192.168"
I used the message "Registering new address" to identify the IP address. - What service did the attacker use to gain access to the system?
Command:cat var/log/secure | grep "Accepted password"
This command will help us identify the service used by the attacker to access the system. - What was the attacker's IP address?
Command:cat var/log/secure | grep "Accepted password"
You will get here the most used IP used by the attacker. - What authentication attack did the attacker use to gain access to the system?
Command:cat var/log/secure | grep "exceeded"
It will validate our theory that the attacker performed beep attack to compromise accounts. - How many accounts was the attacker able to get their password?
Command:cat var/log/secure | grep "Accepted password" | awk '{print $9}' | sort | uniq
It will return the number of accounts with 'Accepted password' log. - When did the attack start?
Command:cat var/log/secure | grep "192.168.196.128" | head
It will return the date. - What is the compromised user account used to gain initial access to the system?
Command:cat var/log/secure | grep "Accepted password" | awk '{print $9}' | sort | uniq
The first user in the result is the answer - What is the MITRE ID of the technique used to achieve persistence after the initial access?
Command:cat home/chandler/.bash_history
You will get the technique used by the attacker and search for that technique on Google. - What is the CVE number used by the attacker to escalate privileges?
Command:cat home/chandler/.bash_history
You will finddbus-send --system --dest=org.freedesktop.Accounts --type=method_call --print-replythen search that on Google and you will get the privilege escalation attack used by the attacker. - The attacker dropped a backdoor to achieve persistence. The backdoor received commands from a Gmail account. What is the email used to send commands?
Command:cat var/spool/cron/root
This will give you the cron for root and you will see the backdoor used by the attacker to achieve persistence.
Command:cat usr/bin/xxx.py
Read the backdoor to identify the email of the attacker. - The attacker downloaded a keylogger to capture users' keystrokes. What is the secret word the attacker was able to exfiltrate?
Steps:
1.cat home/rachel/.bash_history- Checking rachel's history, we noticed that the attacker usedwgetto download a malicious shell script.
2.cat etc/xfil.py- Found a file namexfil.pythat contains the keylogger by the attacker to exfiltrate data.
3.ls -la home/rachel- There was a file namedxfil.txtin rachel's folder and based on thexfil.pyfile, the attacker is usingtermbin.comto upload the keystrokes then the attacker's script stripped the path part of the generated link.
4.cat home/rachel/xfil.txt- You will see 4 letters inside the file.
5. Visit the link:https://termbin.com/xxxxbut the link is no longer working.
6. Used the wayback machine to check for possible mirror and we found 1 capture in August 25, 2021.
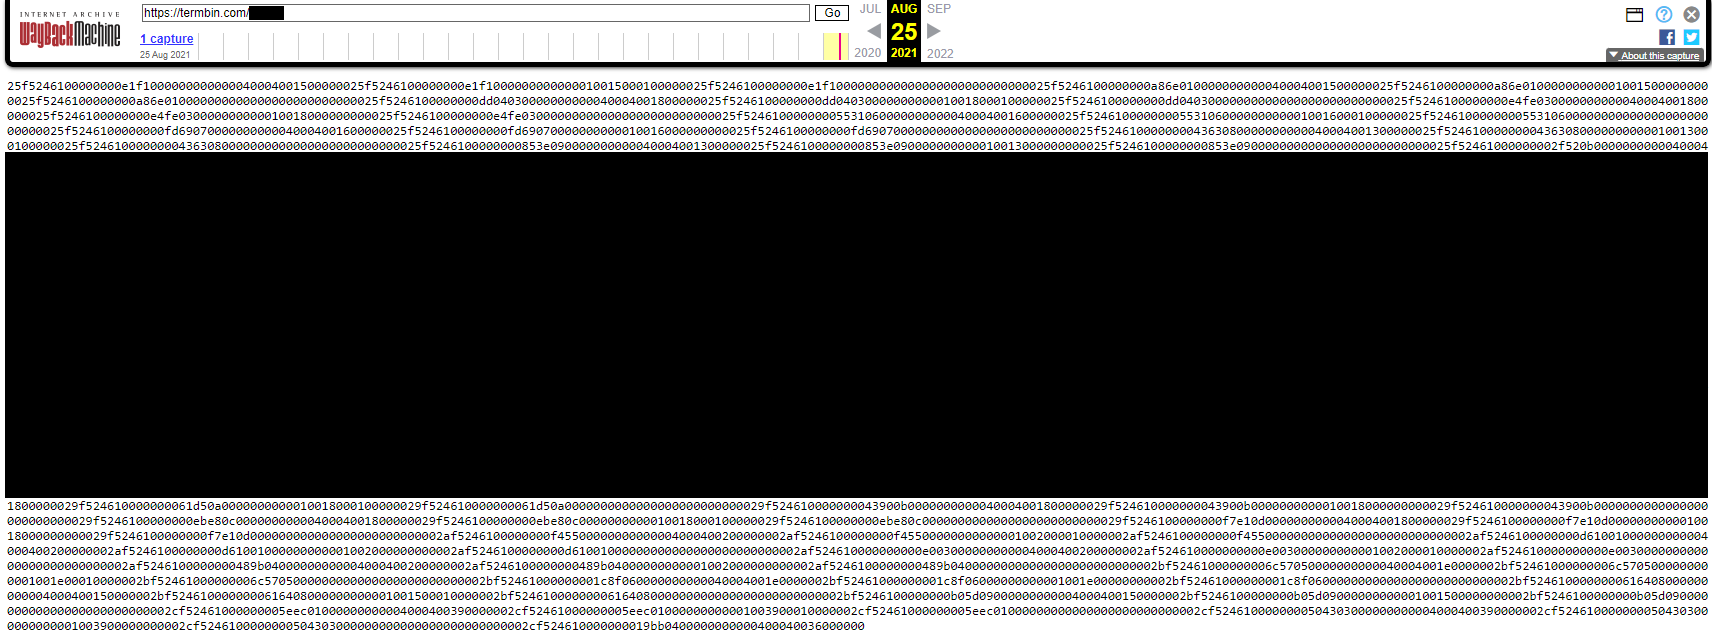
7. We reviewed the attacker's python script once again and he is reading the /dev/input/event1 which is for keyboard. So we saved the exfiltrated data from termbin and saved it in xfil file.
8. We then converted it into hex using this command: cat xfil | xxd -r -p > decoded-xfil
9. Searching for a script to decode the decoded-xfil file via Google gave us this
gist: https://gist.github.com/movitto/a2f62966cd8f83c5d2acfa31879b2442
10. We used the script and modified it by changing the value of DEVICE
parameter in the script.
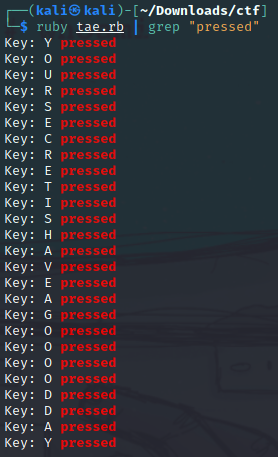
Script used:
#!/usr/bin/ruby
# Read keyboard presses / release / holds on Linux
# Released under the MIT License

# Use binary_struct to process blobs
require('binary_struct')

##################!!!!######################
#!!!!CHANGE ME TO YOUR KEYBOARD DEVICE!!!!!#
############################################
# Device to READ
DEVICE = '/home/kali/Downloads/ctf/decoded-xfil'

# Keymappings, more can be found at
# https://github.com/torvalds/linux/blob/master/include/uapi/linux/input-event-codes.h
KEYS = {
  1  => "ESC",
  2  => "1",
  3  => "2",
  4  => "3",
  5  => "4",
  6  => "5",
  7  => "6",
  8  => "7",
  9  => "8",
  10 => "9",
  11 => "0",
  16 => "Q",
  17 => "W",
  18 => "E",
  19 => "R",
  20 => "T",
  21 => "Y",
  22 => "U",
  23 => "I",
  24 => "O",
  25 => "P",
  30 => "A",
  31 => "S",
  32 => "D",
  33 => "F",
  34 => "G",
  35 => "H",
  36 => "J",
  37 => "K",
  38 => "L",
  44 => "Z",
  45 => "X",
  46 => "C",
  47 => "V",
  48 => "B",
  49 => "N",
  50 => "M"
}

# Define struct input_event
# https://www.kernel.org/doc/Documentation/input/input.txt
#
# Note!!!: make sure the byte lengths here are aligned with your system architecture:
# https://apidock.com/ruby/String/unpack
InputEvent = BinaryStruct.new(['Q', :sec,
                               'Q', :usec,
                               'S', :type,
                               'S', :code,
                               'l', :value])


dev = File.open(DEVICE, 'rb')

# Read input events from stream, decode, and output to stdout
while bin = dev.read(InputEvent.size)
  evnt = InputEvent.decode(bin)
  if evnt[:type] == 1
       key = evnt[:code]
       if KEYS.key?(key)
            key = KEYS[key]
         action = case evnt[:value]
                  when 0 then
                    "released"
                  when 1 then
                    "pressed"
                  when 2 then
                    "held"
                  else
                      "?"
                  end
         puts "Key: #{key} #{action}"
       end
  end
end

# fin!
Final Words
Overall, I had fun solving the challenges and I did this live in our InfoSec Philippines server with many people watching me solving this CTF.
I also talked to one of the admin of CyberDefenders and they asked me not to include the answers in the writeup as they will publish it to the public via https://cyberdefenders.org/labs/.
That's all. Thanks for reading.
Member discussion